
Everything has an expiration date
★★★[JSP & Servlet] 20231208 [프로그램소스 (HTML → JSP)] -Send03, Receive03, Send04, Receive04, Send05, Receive05 본문
[JSP & Servlet]/Program source (JSP & Servlet)
★★★[JSP & Servlet] 20231208 [프로그램소스 (HTML → JSP)] -Send03, Receive03, Send04, Receive04, Send05, Receive05
Jelly-fish 2023. 12. 10. 15:24WebApp07
 01
01
Send03.html
<!DOCTYPE html>
<html>
<head>
<meta charset="UTF-8">
<title>Send03.html</title>
<link rel="stylesheet" type="text/css" href="css/main.css">
</head>
<body>
<!--
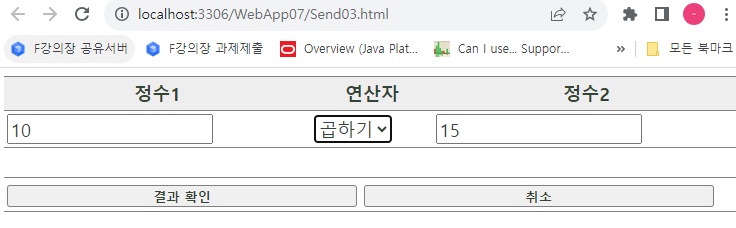
○ 데이터 송수신 실습 03
- 두 개의 정수와 연산자를 입력받는 html 페이지를 구성한다.
select
정수1 [ textbox ] [ 더하기 ▼ ] 정수2 [ textbox ]
↑ 빼기 ↑
45 곱하기 32
나누기
< 결과 확인 > < 취소 > → button
- 데이터 입력 및 선택 후 결과 확인 버튼 클릭 시
『입력하신 45와(과) 32의 연산 결과는 77 입니다.』
라는 내용을 출력하는 JSP 페이지(Receive03.jsp)를 구성하여
데이터를 전달할 수 있도록 한다.
- 사용자의 최초 요청 주소는
http://localhost:3306/WebApp07/Send03.html 로 한다.
○ Send03.html
Receive03.jsp
(~ 12:25)
-->
<div>
<form action="Receive03.jsp" method="post">
<table class="table">
<tr>
<th>정수1</th>
<th>연산자</th>
<th>정수2</th>
</tr>
<tr>
<td>
<input type="text" name="num1" class="txt">
</td>
<td>
<select name="op">
<option value="+">더하기</option>
<option value="-">빼기</option>
<option value="*">곱하기</option>
<option value="/">나누기</option>
<!--
[WARNING!!]======================================
※※※※※※※※※※※※※※※※※※※※※※※※※
데이터 전송방식이 get일 때
value를 특수문자 (+, -, *, /)로 넣게 되면
url 주소창에 특수문자가 삽입되어 문제가 될 수 있으므로
이를 주의하도록 하자!!
※※※※※※※※※※※※※※※※※※※※※※※※※
-->
</select>
</td>
<td>
<input type="text" name="num2" class="txt">
</td>
</tr>
<tr style="height: 30px;">
</tr>
<tr>
<td colspan="3">
<button type="submit" class="btn control" style="width: 48%">결과 확인</button>
<button type="reset" class="btn control" style="width: 48%">취소</button>
</td>
</tr>
</table>
</form>
</div>
<!--
<div>
<form action="Receive03.jsp" method="post">
정수1 <input type="text" name="num1" class="txt">
<select name="oper">
<option value="더하기">더하기</option>
<option value="빼기">빼기</option>
<option value="곱하기">곱하기</option>
<option value="나누기">나누기</option>
</select>
정수1 <input type="text" name="num2" class="txt">
<br><br>
<button type="submit" class="btn" style="width: 150px;">결과 확인</button>
<button type="reset" class="btn" style="width: 150px;">취소</button>
</form>
</div>
-->
</body>
</html>
Receive03.jsp
<%@ page contentType="text/html; charset=UTF-8"%>
<%--
[내 풀잉]==================================================
<%
	request.setCharacterEncoding("UTF-8");

	String strNum1 = request.getParameter("num1");
	String strNum2 = request.getParameter("num2");
	String operStr = request.getParameter("oper");

	int num1, num2, result;

	num1=num2=result=0;

	try
	{
		num1 = Integer.parseInt(strNum1);
		num2 = Integer.parseInt(strNum2);


		if (operStr.equals("더하기"))
			result = num1+num2;
		else if (operStr.equals("빼기"))
			result = num1-num2;
		else if (operStr.equals("곱하기"))
			result = num1*num2;
		else if (operStr.equals("나누기"))
			result = num1/num2;

	}
	catch(Exception e)
	{
		System.out.println(e.toString());
	}


%>
 --%>

 <%
 	// 스크립릿 영역

 	// 이전 페이지(Send03.html)로부터 넘어온 데이터 수신
 	// → num1, num2, op
 	String num1Str = request.getParameter("num1");
 	String num2Str = request.getParameter("num2");
 	String op = request.getParameter("op");

 	String result = "";

 	int num1 = 0;
 	int num2 = 0;

 	try
 	{
 		num1 = Integer.parseInt(num1Str);
 		num2 = Integer.parseInt(num2Str);

 		if (op.equals("+"))
 			result = String.valueOf(num1 + num2);
 		else if (op.equals("-"))
 			result = String.valueOf(num1 - num2);
 		else if (op.equals("*"))
 			result = String.valueOf(num1 * num2);
 		else if (op.equals("/"))
 		{
 			//result = String.valueOf(num1 / num2);
 			//result = String.valueOf(num1 / (double)num2);
 			result = String.format("%.1f", num1 / (double)num2);
 			//*****************************************************
 			// View 에게 문자열만 보내주는 방식으로 처리한 것이다.
 			//*****************************************************
 		}
 	}
 	catch(Exception e)
 	{
 		System.out.println(e.toString());
 	}

 %>

<!DOCTYPE html>
<html>
<head>
<meta charset="UTF-8">
<title>Receive03.jsp</title>
<link rel="stylesheet" type="text/css" href="css/main.css">
<style type="text/css">
	span {color: blue; font-weight: bold; font-size: 15pt;}
	#result {color: red;}
</style>
</head>
<body>

<div>
	<h1>데이터 송수신 실습 03</h1>
	<hr>
</div>

<div>
	<!-- 입력하신 <span>45</span>와(과) <span>32</span>의 -->
	입력하신 <span><%=num1 %></span>와(과) <span><%=num2 %></span>의
	연산 결과는 <span id="result"><%=result %></span> 입니다.
</div>


<%--[내 풀잉]


<div>
	입력하신 <%=num1 %>와(과) <%=num2 %>의 연산 결과는 <%=result %> 입니다.
</div>
--%>

</body>
</html>
 01
01
★ Send04.html
<!DOCTYPE html>
<html>
<head>
<meta charset="UTF-8">
<title>Send04.html</title>
<link rel="stylesheet" type="text/css" href="css/main.css">
<style type="text/css">
@font-face {
font-family: 'JeonjuCraftGoR';
src: url('https://cdn.jsdelivr.net/gh/projectnoonnu/noonfonts_2310@1.0/JeonjuCraftGoR.woff2') format('woff2');
font-weight: normal;
font-style: normal;
}
* { font-family: 'JeonjuCraftGoR';}
tr {height: 50px;}
th {background-color: #eee;}
input:focus {background-color: #eee;}
.msg {color: red; font-size: small; display: none;}
</style>
<script type="text/javascript">
function functionTest()
{
// 확인
alert("함수 호출~!!!");
// 현재 문서에 form이 하나밖에 없으므로, 0번째.
/* document.forms[0].submit(); */
// <form> 태그에 name을 부여하여, 그 이름에 해당하는 form을 submit!
//memberForm.submit();
// <form> 태그에 id를 부여하여, 그 아이디에 해당하는 객체(form)을 submit!
//document.getElementById("memberForm").submit();
//return false;
return true;
}
function formCheck()
{
//return false; //-- 현재 페이지에 그대로 남아있음
//return true; //-- 요청 페이지로 제어권 이전
// 문서의 내용 점검 → 통과(적합) → return true;
// → submit 액션 처리로 제어권 넘김
// 문서의 내용 점검 → 반려(부적합) → return false;
// → submit 액션 처리로 제어권을 넘기지 안혹 현재 페이지에 잔류
// 점검사항 체크...
// → 문제 발생(발견) → return false;
// → 문제 발생하지 않음(발견되지 않음) → return true;
var userId = document.getElementById("userId");
var userPw = document.getElementById("userPw");
var userName = document.getElementById("userName");
var userTel = document.getElementById("userTel");
var idMsg = document.getElementById("idMsg");
var pwMsg = document.getElementById("pwMsg");
var nameMsg = document.getElementById("nameMsg");
var telMsg = document.getElementById("telMsg");
//★ [CHECK!!]
//======================================================================
// form 내부의 컨트롤에 대한 값을 변경하고 이 함수를 다시 호출할 때 마다
// 기존 안내되었던 에러 메세지를 지우고 다시 확인할 수 있도록 처리
//======================================================================
//********************************************************************
// [이름을 입력하세요!]
// → 사용자가 이름을 입력하고 나서
// 다른 것이 비워졌을 때도
// 다른 칸이 비워져서 함수가
// 또다시 호출됐을 때도 문구가 보임... 이럼 안돼!
// 입력이 필요한 부분에만 표시가 되도록! 입력이 완료된 창에는
// 빨간 경고문구가 뜨지 않도록 구성한 것!!
//********************************************************************
idMsg.style.display = "none";
pwMsg.style.display = "none";
nameMsg.style.display = "none";
telMsg.style.display = "none";
if (userId.value == "") //-- 아이디가 입력되지 않은 상황
{
//alert("아이디가 입력되지 않은 상황");
//[이건 진짜 대박이야...]
//<span class="msg" id="idMsg">아이디를 입력하세요.</span>
// 이렇게 작성했던 것을 display: none; 으로 두었다가
// 스타일을 변경시킨다.
//▩▩▩▩▩▩▩▩▩▩▩▩▩▩▩▩▩▩▩▩▩▩
idMsg.style.display = "inline";
//▩▩▩▩▩▩▩▩▩▩▩▩▩▩▩▩▩▩▩▩▩▩
userId.focus();
return false;
}
// [주의 사항]
// 아이디를 입력하지 않은 상황이 아닐 때, 모두 입력된 상황인 것이 아니므로
// else if 로 구성하지 않고
// 독립적인 if로 구성해야 한다!
if (userPw.value == "") //-- 패스워드가 입력되지 않은 상황
{
pwMsg.style.display = "inline";
userPwd.focus();
return false;
}
if (userName.value == "") //-- 이름이 입력되지 않은 상황
{
nameMsg.style.display = "inline";
userName.focus();
return false;
}
if (userTel.value == "") //-- 전화번호가 입력되지 않은 상황
{
telMsg.style.display = "inline";
userTel.focus();
return false;
}
return true;
}
function omission()
{
// ▤▤▤▤▤▤▤▤▤▤▤▤▤▤▤▤▤▤▤▤▤▤▤▤▤▤▤▤▤▤▤▤▤▤▤▤▤
// (1). 아이디, 패스워드, 이름, 전화번호를 getElementById("id")로 value를
// 가져온다.
// ▤▤▤▤▤▤▤▤▤▤▤▤▤▤▤▤▤▤▤▤▤▤▤▤▤▤▤▤▤▤▤▤▤▤▤▤▤
var userId = document.getElementById("uId").value;
var userPwd = document.getElementById("uPwd").value;
var userName = document.getElementById("uName").value;
var userTel = document.getElementById("uTel").value;
// ▤▤▤▤▤▤▤▤▤▤▤▤▤▤▤▤▤▤▤▤▤▤▤▤▤▤▤▤▤▤▤▤▤▤▤▤▤
// ▤▤▤▤▤▤▤▤▤▤▤▤▤▤▤▤▤▤▤▤▤▤▤▤▤▤▤▤▤▤▤▤▤▤▤▤▤
// (2). 필수 입력 값이 null일 경우, 아래의 과정을 수행한다.
// ▤▤▤▤▤▤▤▤▤▤▤▤▤▤▤▤▤▤▤▤▤▤▤▤▤▤▤▤▤▤▤▤▤▤▤▤▤
//========================================================================
// ◎ 누락됐을 경우
//========================================================================
// ① 안내창을 띄운다. : 필수 입력 항목을 입력하지 않으셨습니다.
// ② 커서를 입력 창으로 이동시킨다.
// ⓒ false 를 반환해서, submit이 실행되지 않도록 한다.
//========================================================================
if (userId == "")
{
alert("필수 입력 항목 [아이디]를 입력하지 않으셨습니다.");
document.getElementById("uId").focus();
return false;
}
if (userPwd == "")
{
alert("필수 입력 항목 [패스워드]를 입력하지 않으셨습니다.");
document.getElementById("uPwd").focus();
return false;
}
if (userName == "")
{
alert("필수 입력 항목 [이름]을 입력하지 않으셨습니다.");
document.getElementById("uName").focus();
return false;
}
if (userTel == "")
{
alert("필수 입력 항목 [전화번호]를 입력하지 않으셨습니다.");
document.getElementById("uTel").focus();
return false;
}
/*
====================================================
★ [else 문에서 다음과 같은 방식으로도 처리 가능!!!]
====================================================
document.getElementById("폼아이디").submit();
====================================================
*/
return true;
}
</script>
</head>
<body>
<div>
<h1>데이터 송수신 실습 04</h1>
<hr>
</div>
<!--
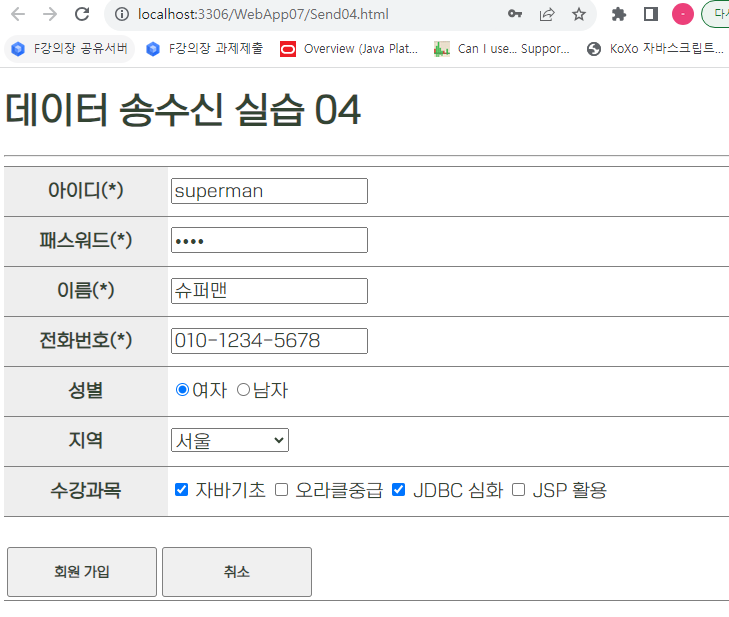
○ 데이터 송수신 실습 04
- 회원 가입과 관련한 기본 정보를 입력받는 html 페이지를 작성한다.
- 입력된 데이터를 서버로 전송하기 전에
(즉, 클라이언트 측에서 작성한 내용을 서버에 제출하기 전에)
입력 데이터에 대한 기본적인 검사 과정을
자바스크립트를 활용하여 추가할 수 있도록 한다.
아이디(*) [ textbox ]
패스워드(*) [ textbox ]
이름(*) [ textbox ]
전화번호(*) [ textbox ]
성별 ● 여자 ○ 남자
지역 [ 서울 ▼ ]
대전
광주
대구
수강과목 □ 자바기초 □ 오라클중급 □ JDBC 심화 □ JSP 활용
< 회원가입 > < 취소 >
- 필수 입력 항목(*)을 포함한 입력 내용을 구성한 후
회원 가입 버튼 클릭 시
회원 입력 정보들의 내용을 출력하는 JSP 페이지(Receive04.jsp)를 구성하여
데이터를 전달할 수 있도록 한다.
- 사용자의 최초 요청 주소는
http://localhost:3306/WebApp07/Send04.html 로 한다.
○ Send04.html
Receive04.jsp
※ 《Javascript 처리》
[submit 할 때, 입력이 누락 됐는지 안 됐는지를 확인하는 것으로 하자.]
-->
<!-- ※ form 태그의 『onsubmit』 : submit 액션이 발생할 경우
이 때 호출되는 자바스크립트 함수에서
return true; 할 경우... Receive04.jsp 로 제어권이 넘어가게 되며
return false; 할 경우... Receive04.jsp 로 제어권이 넘어가지 않는다. -->
<!-- <form action="Receive04.jsp" method="post" onsubmit="return omission();"> -->
<!-- <form action="Receive04.jsp" method="post" name="memberForm" id="memberForm"> -->
<!-- <form action="Receive04.jsp" method="post" name="memberForm" id="memberForm"> -->
<!-- <form action="Receive04.jsp" method="post" onsubmit="return false;"> -->
<!-- <form action="Receive04.jsp" method="post" onsubmit="return true;"> -->
<!-- <form action="Receive04.jsp" method="post" onsubmit="functionTest();">
앞에 return을 써 주어야 한다.-->
<!-- <form action="Receive04.jsp" method="post" onsubmit="return functionTest();"> -->
<div>
<form action="Receive04.jsp" method="post" onsubmit="return formCheck();">
<table class="table">
<tr>
<th>
아이디(*)
</th>
<td>
<!-- id, name이 같다고 해서 문제 발생하지 않는다. -->
<input type="text" class="txt" name="userId" id="userId">
<span class="msg" id="idMsg">아이디를 입력하세요.</span>
</td>
</tr>
<tr>
<th>
패스워드(*)
</th>
<td>
<input type="password" class="txt" name="userPw" id="userPw">
<span class="msg" id="pwMsg">패스워드를 입력하세요.</span>
</td>
</tr>
<tr>
<th>
이름(*)
</th>
<td>
<input type="text" class="txt" name="userName" id="userName">
<span class="msg" id="nameMsg">이름을 입력하세요.</span>
</td>
</tr>
<tr>
<th>
전화번호(*)
</th>
<td>
<input type="text" class="txt" name="userTel" id="userTel">
<span class="msg" id="telMsg">전화번호를 입력하세요.</span>
</td>
</tr>
<tr>
<th>
성별
</th>
<td>
<!-- radio 속성이므로, name이 똑같아야 한다. -->
<!-- checked 속성(기본값 설정)을 통해 null 값이 넘어오지 않도록 구성할 수도 있다. -->
<input type="radio" name="userGender" value="여성" id="female"
checked="checked">여자
<input type="radio" name="userGender" value="남성" id="male">남자
</td>
</tr>
<tr>
<th>
지역
</th>
<td>
<select id="userCIty" name="userCity">
<!-- 사용자가 아무런 선택 안 했을 때, value를 전달하지 않도록. -->
<!-- 반드시 사용자가 선택했을 때 값을 받을 수 있도록 하자. -->
<option>== 선택 ==</option>
<option value="서울">서울</option>
<option value="대전">대전</option>
<option value="광주">광주</option>
<option value="대구">대구</option>
</select>
</td>
</tr>
<tr>
<th>
수강과목
</th>
<td>
<label>
<input type="checkbox" name="userSubject" value="자바기초" id="check1"> 자바기초
</label>
<label>
<input type="checkbox" name="userSubject" value="오라클중급" id="check2"> 오라클중급
</label>
<label>
<input type="checkbox" name="userSubject" value="JDBC 심화" id="check3"> JDBC 심화
</label>
<label>
<input type="checkbox" name="userSubject" value="JSP 활용" id="check4"> JSP 활용
</label>
</td>
</tr>
<tr>
<td colspan="2">
<br>
<!--*******************************************
<button type="submit" class="btn control"
style="width: 150px; height: 50px;"
onclick="functionTest()">회원 가입</button>
***********************************************-->
<!-- 함수 호출은 한 이후에, 바로 submit을 해버린다.
button의 타입이 submit이므로...
이런 상황에서는 버튼을 submit으로 만들지 말자. -->
<!-- 【ⓐ button 타입으로 구성. 자바스크립트에서 submit 하자.】 -->
<!--
<button type="button" class="btn control"
style="width: 150px; height: 50px;"
onclick="functionTest()">회원 가입</button>
-->
<!--ⓑ 다시 submit으로 돌아가자! [onclick 삭제.]-->
<button type="submit" class="btn control"
style="width: 150px; height: 50px;">회원 가입</button>
<button type="submit" class="btn control"
style="width: 150px; height: 50px;">취소</button>
</td>
<!-- <td>
<input type="submit" class="btn" value="회원가입">
</td>
<td>
<input type="reset" class="btn" value="취소">
</td> -->
</tr>
</table>
</form>
</div>
</body>
</html>
Receive04.jsp
<%@ page contentType="text/html; charset=UTF-8"%>
<%--
▩▩▩▩▩▩▩▩▩▩▩▩▩▩▩▩▩▩▩▩▩▩▩▩▩▩▩▩▩▩▩▩▩▩
[내 풀이]
▩▩▩▩▩▩▩▩▩▩▩▩▩▩▩▩▩▩▩▩▩▩▩▩▩▩▩▩▩▩▩▩▩▩
<%
	//==============================================
	// (1). 인코딩 방식 변경
	//==============================================
	request.setCharacterEncoding("UTF-8");
	//==============================================

	//==========================================================
	// (2). 필수적으로 입력받는 값은 후속처리 하지 않음.
	//      ◎ [city의 경우, 드롭다운 형식이므로]
	//         [기본값 "서울"로 무조건 선택 됨!]
	//==========================================================
	String id = request.getParameter("userId");
	String pwd = request.getParameter("userPwd");
	String name = request.getParameter("userName");
	String tel = request.getParameter("userTel");
	String city = request.getParameter("city");
	//==========================================================


	//========================================================
	// (3). null로 들어올 수 있는 값들을 가져온다.
	//========================================================
	String gender = request.getParameter("gender");
	String[] subjectArr = request.getParameterValues("subject");
	//========================================================

	//========================================================
	// (4). 값이 null일 경우, 문자열을 교체해 준다.
	//========================================================
	if (gender == null)
		gender = "성별 선택 안 함";
	if (subject == null)
		subject = "과목 선택 안 함";
	//========================================================

%>
 --%>
<%
	// 스크립릿 영역

	// 이전 페이지(Send04.html)로부터 넘어온 데이터 수신
	// → userId.userPw, userName, userTel, userGender, userCity, userSubject


	request.setCharacterEncoding("UTF-8");

	String userId = request.getParameter("userId");
	String userPw = request.getParameter("userPw");
	String userName = request.getParameter("userName");
	String userTel = request.getParameter("userTel");

	String userGender = request.getParameter("userGender");
	String userCity = request.getParameter("userCity");

	//String userSubject = request.getParameter("userSubject");	// (Ⅹ)

	// check~!!!
	String[] userSubjectArr = request.getParameterValues("userSubject");

	String subjectStr = "";
	if (userSubjectArr != null)
	{
		for (int i = 0; i<userSubjectArr.length; i++)
		{
			subjectStr += "[" + userSubjectArr[i].toString() + "]";
		}
	}

	// ※ 추후에는 수신된 데이터를... 쿼리문을 통해 DB 에 입력하는
	//    처리 과정 등이 포함될 것임을 염두하며 작업을 진행할 수 있도록 하자.

%>

<!DOCTYPE html>
<html>
<head>
<meta charset="UTF-8">
<title>Receive04.jsp</title>
<link rel="stylesheet" type="text/css" href="css/main.css">

<style type="text/css">


	@font-face {
				    font-family: 'JeonjuCraftGoR';
				    src: url('https://cdn.jsdelivr.net/gh/projectnoonnu/noonfonts_2310@1.0/JeonjuCraftGoR.woff2') format('woff2');
				    font-weight: normal;
				    font-style: normal;
				}
		* 		{ font-family: 'JeonjuCraftGoR';}
		h1		{ text-align: center; }
		table 	{ padding: 10pt; margin: auto; border-radius: 20pt; width: 40%; background-color: rgba( 255, 255, 255, 0.5 );}
		th		{ padding: 10pt; border-radius: 10pt; background-color: #9e95f5; background-color: rgba( 255, 255, 255, 0.5 );}
		td		{ padding: 10pt; border-radius: 10pt; text-align: center;}
		body	{ background-image: url("images/시나모롤님_배경화면.jpg");}
		span	{ color: blue; font-size: 15pt; font-weight: bold; }
		div 	{ margin: auto; width: 50%;  text-align: center; background-color: rgba( 255, 255, 255, 0.5 ); padding: 10pt; border-radius: 10pt;}
</style>

</head>
<body>

<div>
	<h1>데이터 송수신 실습 04</h1>
	<hr>
</div>

<div>
	<h2>가입 승인 내역</h2>

	<!-- <p>아이디 : <span>superman</span></p> -->
	<p>아이디 : <span><%=userId %></span></p>


	<!-- <p>패스워드 : <span>1234</span></p> -->
	<p>패스워드 : <span><%=userPw %></span></p>

	<!-- <p>이름 : <span>정현욱</span></p> -->
	<p>이름 : <span><%=userName %></span></p>

	<!-- <p>전화번호 : <span>010-1234-5678</span></p> -->
	<p>전화번호 : <span><%=userTel %></span></p>

	<!-- <p>성별 : <span>남성</span></p> -->
	<p>성별 : <span><%=userGender %></span></p>

	<!-- <p>지역 : <span>서울</span></p> -->
	<p>지역 : <span><%=userCity %></span></p>

	<!-- <p>수강과목: <span>[자바기초] [오라클중급]</span></p> -->
	<p>수강과목: <span><%=subjectStr %></span></p>
</div>


<%--
<div>
	<table border="1">
		<tr>
			<th>
				아이디
			</th>
			<td>
				<%=id %>
			</td>
		</tr>
		<tr>
			<th>
				패스워드
			</th>
			<td>
				<%=pwd %>
			</td>
		</tr>
		<tr>
			<th>
				이름
			</th>
			<td>
				<%=name %>
			</td>
		</tr>
		<tr>
			<th>
				전화번호
			</th>
			<td>
				<%=tel %>
			</td>
		</tr>
		<tr>
			<th>
				성별
			</th>
			<td>
				<%=gender %>
			</td>
		</tr>
		<tr>
			<th>
				지역
			</th>
			<td>
				<%=city %>
			</td>
		</tr>
		<tr>
			<th>
				수강과목
			</th>
			<td>
				<%for (int i = 0; i < subjectArr.length; i++)
				  {%>
					<%=subjectArr[i] %>
				<%}%>
			</td>
		</tr>

	</table>
</div>
 --%>

</body>
</html>
 01
01
Send05.html
<!DOCTYPE html>
<html>
<head>
<meta charset="UTF-8">
<title>Send05.html</title>
<script type="text/javascript">
function isSelected(obj)
{
var dan = document.getElementById("dan");
//alert(dan.options[dan.selectedIndex].value);
if (dan.options[dan.selectedIndex].value == "-- 선택하세요 --")
{
alert("아직선택안함");
return;
}
else
{
obj.submit();
}
}
function formChange(obj)
{
// 확인
//alert("함수 호출~!!!");
// 확인
//alert(obj);
//--==>> [object HTMLFormElement]
// ※ obj 변수(이 함수의 매개변수)에는 form 객체가 저장되어 있다.
// 필요에 따라 전송하기 전에 검증 절차를 추가하는 것이 가능하다.
obj.submit();
//-- 『폼객체.submit()』
// 함수 호출을 통해 form 객체의 데이터를
// 서버로 전송하는 것이 가능하다.
}
</script>
<link rel="stylesheet" type="text/css" href="css/main.css">
</head>
<body>
<!--
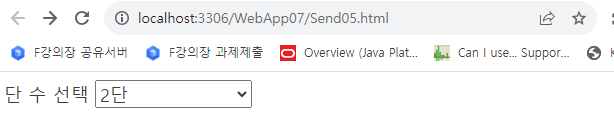
○ 데이터 송수신 실습 05
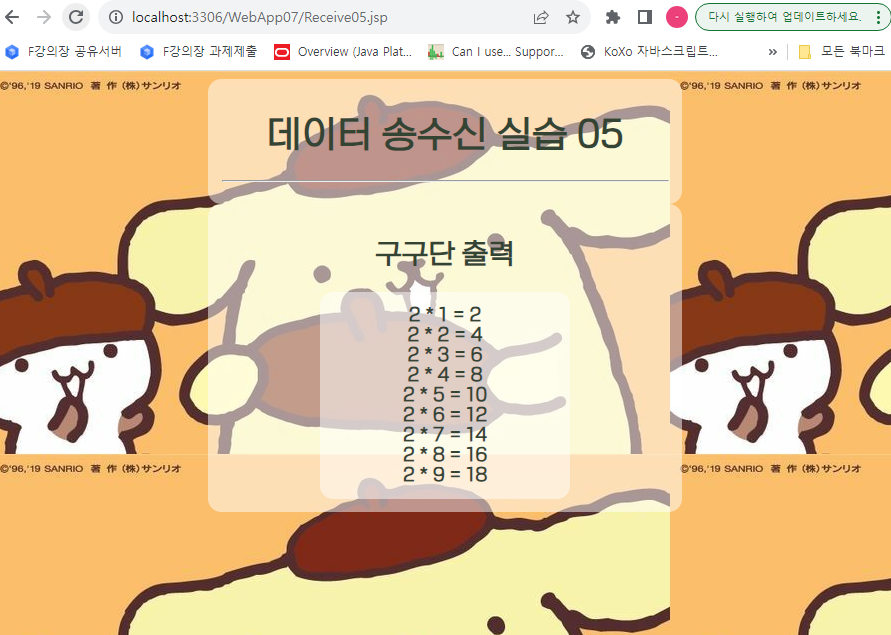
- 구구단 결과를 출력하는 JSP(Receive05.jsp)를 구성한다.
- 원하는 단수를 입력받아 화면에 출력해주는 형태의 페이지로 구현한다.
- 단, submit 버튼 없이 이벤트 처리를 할 수 있도록 한다.
selectbox
단 수 선택 [ -- 선택하세요 -- ▼ ]
1단
2단
3단
:
9단
- select 선택 시
해당 단의 구구단 내용을 출력하는 JSP 페이지(Receive05.jsp)로
데이터를 전달하여 내용을 구성할 수 있도록 한다.
- 사용자 최초 요청 페이지 주소는
http://localhost:3306/WebApp07/Send05.html 로 한다.
○ Send05.html
Receive05.jsp
-->
<!--
--선택하세요-- 없이
1단이 기본값으로 설정되어 있으면,
선택한다고 해도, 변경이 되지 않아서
1단이 출력되지 않는다!!
-->
<div>
<!-- <form action="Receive05.jsp" method="post"> -->
<form action="Receive05.jsp" method="post">
단 수 선택
<!-- <select name="dan" id="dan" onchange="isSelected(this.form)"> -->
<select name="dan" id="dan" onchange="formChange(this.form)">
<!-- [this.form] : this = select 객체
this.form = select 객체를 포함하는 form 객체!!
-->
<option value="-- 선택하세요 --">-- 선택하세요 --</option>
<option value="1"> 1단
<option value="2"> 2단
<option value="3"> 3단
<option value="4"> 4단
<option value="5"> 5단
<option value="6"> 6단
<option value="7"> 7단
<option value="8"> 8단
<option value="9"> 9단
</select>
</form>
</div>
</body>
</html>
Receive05.jsp
<%@ page contentType="text/html; charset=UTF-8"%>
<%
	// 이전 페이지(Send05.html)로부터 넘어온 데이터 수신
	// → dan

	String danStr = request.getParameter("dan");
	int dan = 0;
	String result = "";

	try
	{
		dan = Integer.parseInt(danStr);

		for (int i = 1; i <= 9; i++)
		{
			result += String.format("%d * %d = %d<br>", dan, i, (dan*i));
		}
	}
	catch(Exception e)
	{
		System.out.println(e.toString());
	}


%>

<%-- [내 풀잉]
<%

	request.setCharacterEncoding("UTF-8");

	String strDan = request.getParameter("dan");


	int dan = 0;

	try
	{
		dan = Integer.parseInt(strDan);
	}
	catch(Exception e)
	{
		System.out.println(e.toString());
	}


%>
 --%>
<!DOCTYPE html>
<html>
<head>
<meta charset="UTF-8">
<title>Receive05.jsp</title>
<link rel="stylesheet" type="text/css" href="css/main.css">
<style type="text/css">


	@font-face {
				    font-family: 'JeonjuCraftGoR';
				    src: url('https://cdn.jsdelivr.net/gh/projectnoonnu/noonfonts_2310@1.0/JeonjuCraftGoR.woff2') format('woff2');
				    font-weight: normal;
				    font-style: normal;
				}
		* 		{ font-family: 'JeonjuCraftGoR';}
		h1		{ text-align: center; }
		table 	{ padding: 10pt; margin: auto; border-radius: 20pt; width: 40%; background-color: rgba( 255, 255, 255, 0.8);}
		th		{ padding: 10pt; border-radius: 10pt; background-color: #9e95f5; background-color: rgba( 255, 255, 255, 0.8 );}
		td		{ padding: 10pt; border-radius: 10pt; text-align: center;}
		body	{ background-image: url("https://i.pinimg.com/1200x/29/fb/8a/29fb8ab3c580383c3fa6e23566669e57.jpg");}
		span	{ color: blue; font-size: 15pt; font-weight: bold; }
		div 	{ font-weight: bold;  margin: auto; width: 50%;  text-align: center; background-color: rgba( 255, 255, 255, 0.5 ); padding: 10pt; border-radius: 10pt;}
</style>

</head>
<body>

<div>
	<h1>데이터 송수신 실습 05</h1>
	<hr>
</div>

<div>
	<h2>구구단 출력</h2>
	<div>
		<!-- 결과물... -->
		<%=result %>
	</div>
</div>


<%-- <div>
	결과 확인<br><br>
	<%for (int i = 1; i <= 9; i++)
	  {%>

	  	<%=dan %> * <%=i %> = <%=(dan * i) %> <br>

	<%} %>

</div> --%>


</body>
</html>'[JSP & Servlet] > Program source (JSP & Servlet)' 카테고리의 다른 글
'[JSP & Servlet]/Program source (JSP & Servlet)' Related Articles
more


